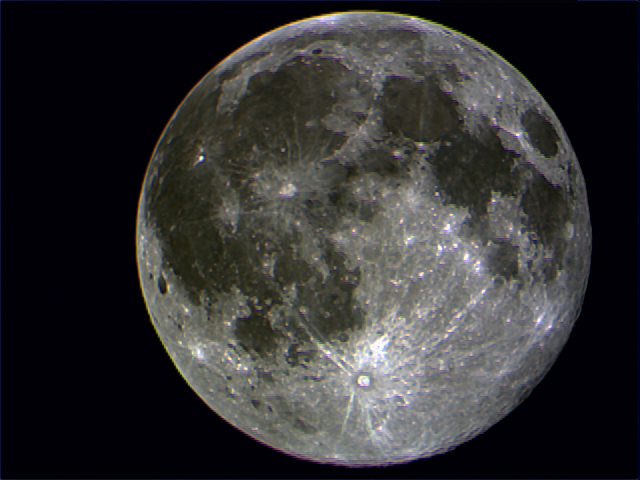
I was able to finally get a full moon shot in one photo. I have mixed thoughts on this. First off it is very satisfying to get the entire moon in one shot. It is also extremely easy to process as one photo rather than a mosaic of several at once.
For white a while I was trying to get all my wide shots into the view of the scope. In this case I used my 6se, the c-11 I have not used yet. . . my neighborhood isn’t the greatest and after a close call I have decided to wait to take it out when I move. Let me digress, with the 6se, I had large objects or wide field shots I would see done and wonder how they were taken. I did quite a bit of digging and experimenting. I normally would have to take 9 shots to fit the entire moon disk into one mosaic photo. I found using correctors and focal reducers I was able to fit the entire disk into the shot. The only draw back is that the focal reducers make the optics faster, meaning more light and having to drop down the gain and exposure time.
The equipment list for the shots in this article I used the following (links are to help you find the equipment instead of having to dig for them like I had, I’m not endorsing any product.):
I also used the moon filter that came with the celestron lens and eyepiece kit in the bundle pack.
For software I used the i-cap from celestron and registax 6 with the 6.1 update installed. and Photoshop for final processing.
I tried a few different settings in the photos I’m not trilled with them as far as detail goes, that’s the draw back from getting the entire picture in one shot. I am going to spend a considerable amount of time experimenting with the settings on the camera to see if I can get better shots through better settings. The thing I am happy about is that I was able to get a rather large shot of a wide view
I’m goign to link my photo album here where you can get the full moon in a 16bit .tif file or the jpeg. I don’t mind you using it just give credit when it applies.
Jpeg versions are as follows:
First of the 4 pics I tooksecond in the seriesthird in the series4thin the series
If you got to see the 2016 Transit of Mercury I congratulate you. If you didn’t, check the time table here. Looks like you’ll get to see one again on November 11th, 2019 . . .nice that would be my youngest sister’s birthday. . . maybe I can get a few pictures and better video for a gift. . .. Next time I hope to have a lunt.
For the transit I got up early, had coffee ready and set up before the sun came up. . .the trees in the neighbors blocked my view until it was underway for about an hour. I then drove over to a friend’s house to record the rest tree free, and so they could see it as well. The transit was something I was like OK, I’ll see it then be bored really fast. honestly It was pretty cool to look and keep checking back to see how far it crossed. I had a great itme and if the sun wasn’t so hot from it being a clear sunny Florida day, on top of it making the laptop overheat and shut down even though it was in the shade, I would have stayed looking the hole time.
What’s the big deal?
The transit occurs on two specific events happen. mercury is on the ascending or descending node. What is this? well an ascending node is described as : “The point in an orbit where a body traveling from south to north crosses a reference plane, such as the plane of the ecliptic (in the case of a Solar System object) or the celestial equator. The opposite point in the orbit, where the body moves from north to south across the reference plane, is the descending node. The longitude of the ascending node is an orbital element. “[1] – David Darling
Secondly the planet Mercury has to be between the earth and the sun on one of those nodes. Mercury’s orbit is inclined 7 degrees that of earth’s so it has to be in the node while we are in line with the sun and Mercury slips in between us. Depending on locations of all parties involved, it makes a huge difference on the incline the planet Mercury passes along the sun’s disk and how long the transit lasts.
This year we got a particularly nice and long view, It was around 7 hours.
The intervals happen at such a frequency that the transits happen 13 or 14 times every century. it gives you a good chance to see it if you miss one or two or three. . . .
Not only do you get to see a celestial event, but there are several notable astronomers that witnessed it as well. If you get to see one you join the ranks of those who have witnessed it such as : William Herschel in England 1802[2] or Observed by Charles Green and James Cook from Mercury Bay in New Zealand.[3] Noted that Mercury had little or no atmosphere 1769 Nov 9. Others such as when Joseph-Nicolas Delisle coordinated scientific observations worldwide. The notable Pierre Gassendi, Jeremy Shakerly, Edmund Halley, Richard Towneley in Lancashire when they tried to determine solar parallax, also noted by Jean Charles Gallet in Avignon; as reported in letter from John Flamsteed to Johannes Hevelius on23 May 1678.[4] Sorry I got caught up in the moment. . . .if you get to observe this celestial event you join the giants that have seen them as well. . . .and if that doesn’t get the hair on the back of your neck up then you might not have a pulse!
The Transit
ok, ok, ok, I know you are excited to see it because I got you all worked up on the intro.
The first set of images which I just took the photos and processed I didn’t worry so much about orientation on the transit. mercury is the little black orb on the disk. the sunspot groups are near center.
This was the first image I got to take about 2 hours into the transit. Trees where in the wayThe second image I took after having to relocate across town to a friend’s house so they could join in.I gave it a little time after my laptop crashed from overheatingMy fourth in the series that came out well towards the end of the transit.Mercury is about to slip off the visible disk of the sun.
In this shot of Mercury slipping off the disk I was there with my 2 friends as we watched, it was somber in tone as we all watched it slip away as if we had just seen something grand come to a sad end. . . I didn’t get the black drop effect image, but this was one of my favorite shots right there.
Of course no transit would be complete with out getting a composite of all the images that show the pathway of the planet across the surface.
2016 Mercury Transit Composite – the true north south orientation of the sun along with the various snapshots of the planet skirting across the visible disk.
If you would like to see better quality images, I keep copies of everything in flikr. they let me use .tif files which are 16 bit over 8 bit jpegs, meaning better detail. feel free to check out the album here. I don’t mind people seeing or taking a copy they like just so long as they give me credit, I do the same for others and would appreciate the acknowledgement. Heck take it down and print it out and put it on your wall in a nice frame 🙂 just remember where you got it from!
For the last few days sun spot group 2529 has marched across the sun’s surface and is looking right at us here on earth. Seeing how there has not been a major group like this in a while I was able to get outside and photograph, I took the opportunity for 2 days to try to get images.
the sun’s surface showing almost no spots. Image courtesy of NASA Solar Dynamic’s Observatory
So far the spot has only produced minor C class flares all directed away from earth. The following probabilities for flares are as follows : C: 60%, M: 10%, X: 1%. The guess I have is that it would pop off at least a C class due to the magnetogram looking like this :
Magnetogram of the Sun image rights NASA SDO
and a close up :
Magnetogram of region 2529 image courtesy of NASA SDO
That being said with he gear I have you can get decent images. I really enjoy looking at the sun. . .weird I know but you can see it waver and boil. It really changes the way you look at things from then on out. . . any way
To get my pics I used my Celestron Neximager5 and my Celestron 6se an for my solar filter I used a glass Solar filter made by Seymour Solar. For software I used Icap which came with my camera and I stacked in Registax. For the settings I tried a few settings, I used the RGB settings and that gives me a almost white disk. I personally prefer the natural look of the BY settings when capturing the sun with this filter as it gives it the familiar orange/yellow color. This is by no means a definitive guide. I just use what works for myself as this is not a solar telescope by Lunt or Coronado.
I don’t think this was too bad considering with out both focal reducers I was able to take a picture of the sun in 9 mosaic shots. . . .which gets old.
Now I will go closer and closer to the spot group I think I did ok for getting some granulation. My seeing conditions were clear but hazy with low wind and med humidity.
Enjoy!
My orientation was slightly off
I should have rotated my camera to reflect the north is about the 10 o’clock region of the sun there. I will make sure in the future.
and even closer:
I zoomed in using my barlow
I used a X2 Barlow lens to help zoom in. I learned to zoom using lenses instead of the camera zoom. zooming using the camera zoom only blows up the pixels making images look blurry and exaggerating the pixels.
I’ve really enjoyed observing the sun. Before you start observing yourself, read over my safety on how to observe the sun here. Last thing I want is some one to not do it properly and lose their eyesight or damage their equipment. Once you start studying the nearest star, and observe it, you start seeing features change, it’s never the same thing twice. Add in the fact that the sheer power and magnificence of it on it’s own scale. . .and then throw in a dash of knowing the same things happen on other stars. . .and wow. . it’s beautiful.
So the events that lead up to this observing session is that on Sept. 2nd or Sept. 3rd there was a large X class flare that shot off the far side of the sun away from earth. On Sept. 5th the sun spots responsible started to come into view, sun spot 2158 and group 2157. we aren’t sure what of the two did it, however, I took some pictures of both. The skies here are not the greatest all the time so I try to get things when they are available. Unfortunately there was too much humidity and I had tracking issues with my scope. The pictures where not of very good quality and not worth trying to get the detail out of them.
On September 10th, the skies cleared and I was able to get a better view of the spots.
Sun pots labeled and solar equator marked
The large group seemed rather strange looking and I kept an eye on it. the reports had been stating that there was a lot of Geomagnetic activity around the spot. I tried to get some Ha shots (Hydrogen Alpha) but they didn’t come out right, the scope didn’t track enough for me o get good images during processing.
I ended up getting a few closer views:
First of two shots of the sunspot 2158Second of two shots of the sunspot 2158
I took these images about 1 hour before it launched off the solar flare. By the time I had called it a day, broke down and brought all the gear inside, downloaded and transferred the images I checked the reports and found it had shot off a flare. I attempted to get a closer shot, what I end up doing is zooming in with the camera, a Celestron NexImager 5. I use the default setting of 4X4 Binding, to “zoom” I decrease this to the lower setting. I’m not sure if it was artifacts caused by using Registax 6 or not, but there is a “line” that seems to go between the 7 o’clock position to the 2 o’clock, I’m pretty sure its from processing in Registax that caused it.
Spot 2158 zoomed in
Now the group to it’s south looked like this:
group 2157
when the sun spot flared, 2158, it launched a Coronal Mass Ejection or CME that registered as a X1.6 directly at us.
2158 impact prediction image from NASA
We had just had a moderate M class right before it by half a day so the X class caught up to and overtook the shock of the smaller M class. This was the first significant activity since January as it’s been pretty calm and relatively small spots or no spots. The northern hemisphere was able to enjoy some very nice Aurora. Otherwise nothing really to report about the sun so far this year.
My oh my there is a whole lot going on in this area of the moon. There are two seas, Mare Serenitatis “Sea of Serenity, as well as Mare Imbrium “Sea of Showers” or “Sea of Rains.” A stunningly circular crater Plato. A few other locations such as Anaxagoras, Posidonius, Astoteles, atlas, Herculese, And Endymion. There is a beautiful mountain range that extends for miles along the center of this photo, oddly I couldn’t find a name for the range it’s very prominent looking like a spine reaching from Copernicus to Plato.
Many features I mentioned in the post are labeled
I have far too many features than I can make into an article I want ot revisit some of these in the future to give each one a shot Plato was one spot I definitely took interest in. I was not too thrilled with the way the Celestron Neximager 5 performed while zooming in in comparison with the Orion deep space video camera. However I’m going to give it another shot because there was a thin layer of clouds that rolled in and sat on target. This could throw off the ability to get a clear image while zoomed in.
Plato is the lava-filled remains of a lunar impact crater. The flat floor of Plato has a relatively low albedo, making it appear dark. The smooth floor doesn’t posses any large impact craters and doesn’t have a peak in the middle. However there are a few small craterlets scattered across the floor.
Plato has developed a reputation for transient lunar phenomena, including flashes of light, unusual color patterns, and areas of hazy visibility. These anomalies are likely a result of seeing conditions, combined with the effects of different illumination angles of the Sun. Two other places that this happens in Aristarchus and Alphonsus, reportedly. They have so far not been recorded. If this is captured in photos it could make a real contribution to science.
Mare Imbrium was created when lava flooded the giant crater formed when a very large object hit the Moon long ago. Estimates of its age range from 3 billion to 4.5 billion years.[2] Mare Imbrium is the second larges sea on the trailing behind Oceanus Procellarum having a diameter of 1146 km.
Plato:
Diameter: 109KM/ 67.73 Miles – Depth: 1 KM/ 62 Miles
Anaxagoras:
Diameter: 51.9KM/ 32.25 Miles – Depth: 3KM/ 1.864Miles
The rays spread out over 900 kilometers/559.234 miles
Posidonius:
Diameter: 95KM/ 59.03 Miles – Depth: 2.3KM/ 1.43 Miles